Friday, April 18, 2014

Paleo Grain Free Peach Melba Almond Muffins

Eggs...I'm sick and tired of eggs!

I've always been an english muffin/oatmeal/muffin top kind of girl.  And then we went paleo(ish).  Or at least my husband did and I'm too lazy to make 2 different dinners.  So I troll the internet trying to find new recipes for breakfast foods (and tons of others too) and try a different muffin recipe every time in search of the "one."   I've noticed I prefer coconut flour bases to almond flour.  I find almond flour too moist for my taste.  But just coconut flour is too dry.   Then I tried some with almond butter bases.  These seem to the ones I like most...moist enough but not too mushy.  My dog loves the increased use of almond butter and how many Costco sized jars I blow through.  

But I'm still hunting.  

It also gets difficult when you add in fruit and the different moisture levels.  I've had good success with with these strawberry muffins made with dehydrated strawberries.  And enjoyed these pumpkin muffins, but have to reduce my carotene intake cause I'm turning ORANGE!  Like...legit orange.  My podiatrist showed off my orange feet to his nurse and secretary.  

A big pro to the paleo diet has been making Passover super easy!   No bread...no problem!  I've been wanting to make some muffins for my family this week and this morning I have my first change.  After scanning my produce selection, I decided on raspberries....then I remembered I had some freeze-dried peaches and Peach Melba almond muffins were born!

Grain-Free, Paleo Peach Melba Almond Muffins
Serves 12

Ingredients:
  • 1/3 cup coconut flour
  • 1/2 tsp baking soda
  • 1/2 tsp baking powder
  • Pinch of salt
  • 5 eggs
  • 1/3 cup honey or maple syrup (I did mostly maple with a squeeze of honey)
  • 1 cup almond butter
  • 2 Tbsp coconut oil or butter
  • 1/4 cup unsweetened applesauce
  • 1/4 cup sliced almonds
  • 3/4 cup raspberries
  • 1/2 cup freeze-dried peaches (I got mine from Target)
Pre-heat oven to 350 degrees Fahrenheit.

Prepare a muffin tin with muffin liners.  **I highly recommend foil liners.  Paper liners always seem to stick!

Combine dry ingredients in a small bowl.  Mix and set aside.

Add almond butter and coconut oil/butter in a large microwavable bowl and heat 45 seconds until softened.  Add in applesauce, eggs, and honey/syrup.  Stir to combine.  Crush peaches and add.  Then add in almonds (I broke mine slightly).  Stir.  Then gently fold in raspberries.

Divide evenly between muffin liners- I used a cookie scoop.  Then bake 20-25 minutes until set and golden brown.  Allow to cool.

Enjoy!


Monday, February 3, 2014

Grain Free/ Low Carb/ "Paleo" Coconut Cashew Biscotti.

I have been making coconut cashew biscotti...a lot of biscotti.  I've probably made about 6 batches since December.  They are truly amazing...just amazing.  And it's all because of these little babies:


You get them at Costco and boy, are they delicious.  Are they 100% paleo?  No, but then again, I'm not 100% paleo.  You can also get them here.  Or make your own. Making your own and omitting the white chocolate chips will make them 100%.  But I'm lazy, so I bought 3 containers...and counting.

So my mother was complaining about missing baked goods while of the paleo diet.  Now while there is plethora of recipes out there and she's an amazing baker, my mother is instead choosing to spend her free time playing Candy Crush.  So I must be the good daughter and bake for her (which I do gladly because 1. I love her to death and 2. I love baking).

Coconut Cashew Biscotti
Based off Paleo Chocolate Orange Hazelnut by Swiss Paleo

Ingredients:
  • 2 cups almond flour
  • 2 tablespoons arrowroot flour
  • 1/2 teaspoon baking soda
  • 1/4 teaspoon salt
  • 1 egg
  • 1/4 cup honey
  • 1 teaspoon vanilla extract
  • 1 teaspoon coconut extract
  • 1/2 cup coconut covered cashews, chopped  (or instead use 1/3 cup cashews, 3 tbsp toasted shredded coconut)
  • 1/4 cup coconut shreds.  (I used to bits at the bottom of the jar...but you can use regular unsweetened shredded coconut and add 2 tablespoons of coconut sugar)
  • 1/4 cup white chocolate chips

Instructions: 
  1. Preheat oven to 350 degrees.

  2. Put the almond flour, arrowroot flour, baking soda and salt together in a bowl and mix.

  3. Add the egg, honey, and extracts and stir to combine (I used my hands...cause I'm a bum)

  4. Add in nuts, coconut shreds and white chocolate chips and gently fold in until combined.

  5. Then place contents onto a sheet of parchment paper and form one long log (about 4 inches wide or whatever your preference).

  6. Bake in oven at 350 degrees for 20-25 minutes until the edges turn golden brown.  Remove from oven and allow to cool.

  7. Lower oven temperature to 275 degrees.

  8. Once cool enough to handle, GENTLY slice into 1/2 -3/4 inch slices.  Place on baking sheet and bake for 10-15 minutes.

  9. Then GENTLY flip the slices over.  Bake for another 10-15 minutes.

  10. Repeat this process until biscotti seems firm and are golden brown.  If they seem to be burning or getting too dark, lower your oven temperature.  You want to dry out the cookies so they have the proper texture.  I think mine were in the oven for 40 minutes after the initial bake.  


Allow to cool and enjoy!

Friday, February 24, 2012

I am terrible...and an oatmeal recipe!

...So yeah, it's only been 5 months since my last post.  School can certainly drain a lot out of you, and I let this blog become a really low priority.  Over this time, I've become addicted to a videogame, finally finished my one credit Physics course, and just been a lazy bum in general.   I have tried many new recipes and there definitely have been some good ones that I will be sharing.

Today I felt like sharing a "recipe" if you can call it that for a craving for healthy pineapple upside down cake...oatmeal.  Yeah, not real cake but the flavor profile matched and it kept me from buying a chocolate heart donut.

Ooo...I'm a sucker for frosting filled donut'

But, I didn't need that 400+ calorie monstrosity.  My friend gave me some pineapple upside down cake, and while it was delicious, it didn't have any pineapple!  It was all buttery and yummy, but again not really worth the calories.  However, it initiated a craving and I unfortunately am a slave to my cravings.  So tonight, after going out to buy the Game of Thrones board game
No I'm not a loser...and yes I'm going to play this tomorrow!  It's way cooler than Magic.   


This card is hilarious!  

And then going to the store to buy some flour for some real cookies I'll be making and posting this weekend, and picking up pineapple since I need to make this asap or my inner cravings beast would consume me, I returned home to make this.   It's basically a recipe for one of those 2 minute magical oatmeal cookie thingies made with a banana, except no banana...and pineapple instead.

Pineapple Upside Down Oatmeal "Cookie"
Serves 1

In a bowl add approximately:
1 tsp. butter
1 tsp. syrup (I used sugarfree)
1 tsp. brown sugar
1/4 tsp. vanilla extract
dash of cinnamon

Cook for 1 minute.  Stir and then add 1.5 tbsp. of drained crushed pineapple, stirring again.  Nuke for another 30 seconds.

Add 1/3 c. regular rolled oats (Not instant).  Stir to combine and flatten into a disk at the bottom on bowl.  I then added a splash of almond milk, just to moisten a little bit.  Cook for 1:30 to 2:30 until all moisture is evaporated and it's almost a solid cookie.  (Note: I did 90 seconds, then added another minute).  Enjoy!  I topped mine with a little more butter and some vanilla frozen yogurt.   It was delicious.

What?!? Not pictures?  I know I stink.  First of all this wasn't a planned post.  And secondly, it's not the most picturesque food item. 
I found one online just to show and it basically looks like cat vomit...yummy!
So instead, you can take a bite, and close your eyes imagining this instead:

Wednesday, September 7, 2011

Internet Issues

Sorry for the lack of a new post, but my internet has decided to slow down to a snails pace of 0.05-0.003 mbps.  So I'm switching providers.  Also it's the first of week so it's crazy busy and my body is adjusting to waking back up at 5:30 am.   So a new post (a real post) will happen soon.  Sorry again and thank you for your patience.

Saturday, September 3, 2011

Ninja Turtle Pudding Pies

Packed with puddin' power!  So I'm sure my first post really should be an introduction of myself to the blogosphere, but instead it's going to dedicated something so rich, indulgent, and unholy that it hasn't been produced in over 10 years.  Teenage Mutant Ninja Turtle Pudding Pies.
Heroes in a half-shell...TURTLE POWER!

Now if you're not a product of the 80's, or familiar with our favorite oozed-covered, butt-kicking testudines, these 4 brothers basically walked into some spilled toxic gunk, and instead of dying horrific deaths, they grew up to be massive anthropomorphized turtles with a prowess for the martial arts.  Oh, and they loved pizza!  And probably would have eaten these pies by the boatload.  These pies were a promotional product made by Hostess during the heyday of the turtles' popularity.  

Unfortunately, I do not remember these pies.  However, my friend came up to visit this weekend and put in a special request that I make them for him.  Being ever the obliging (i.e. gullible and people-pleasing) friend that I am, I said yes.  First, of course, I had to learn what the heck a turtle pie was, so I jumped my computer and Google searched.  Apparently, there is a huge cult following for the heart-cloggers and several petitions trying to get Hostess to remake them.  
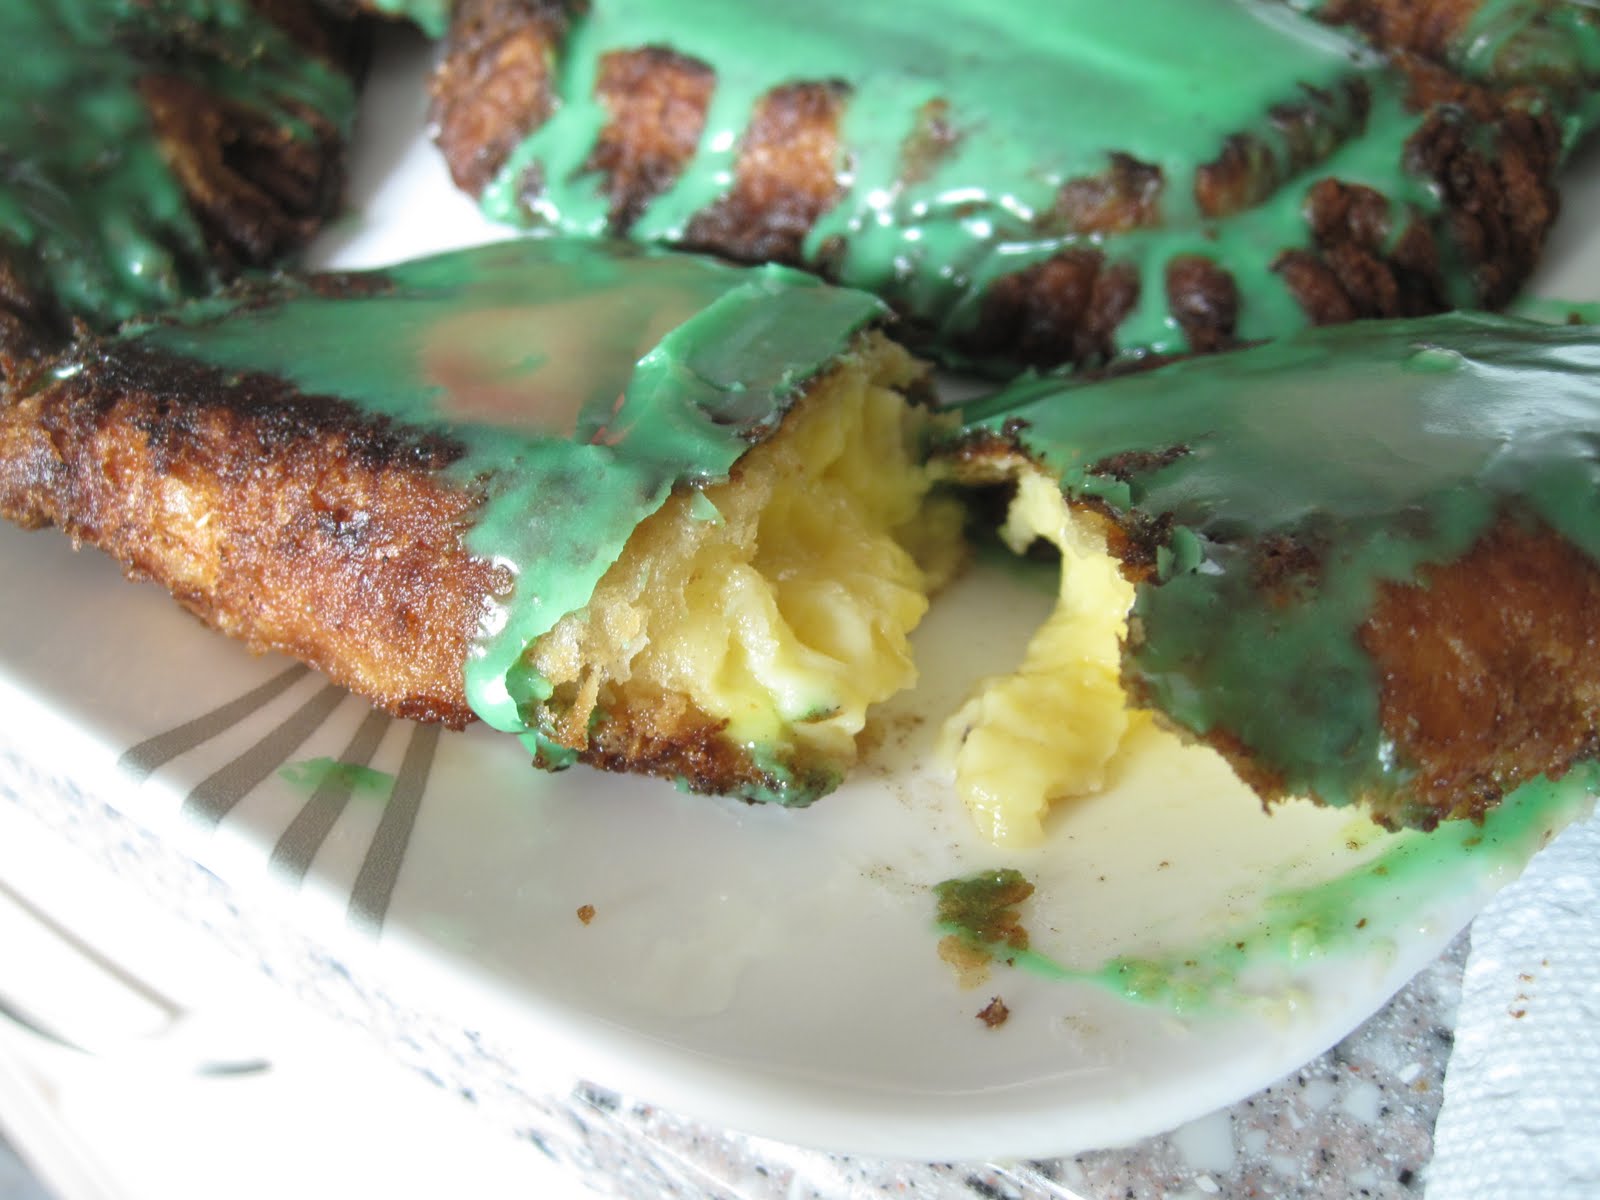
This site was extremely informative for anyone interested, but there really was no recipe for me to follow.  I just got that a turtle pudding pie was a deep-fried pie, filled with vanilla pudding-type substance, and covered in a thick green sugary glaze.
Looks appetizing, right?

So I tried to just search pudding hand pies, and came across a few chocolate varieties but no vanilla.  Since these pies were not refrigerated but shelf stable, I figured in order to recapture my friend's childhood memories I had to avoid the gourmet route and instead try to be as processed as possible. 

With an idea in mind, I headed to my grocery store to pick up the necessities: pudding mix, milk, pre-made pie crust (not in a pan), and green food coloring.  Unfortunately, it was decided that I would have to be making my own crust since the store did not have pie crusts not already jammed into a pan.  And thus the adventure began...
Ninja Turtle Pudding Pies
Serves 12

For Filling:
  • 3.5 cups of milk (I used a combination of 1% and 2%)
  • 2 boxes of vanilla pudding, cook and serve variety (I used My-T-Fine because it was on sale)

For Crust:
Based on J. Kenji Lopez-Alt's Easy Pie Dough from SeriousEats.com 

  • 12.5 ounces all-purpose flour
  • 2 tablespoons sugar
  • 1 teaspoon kosher salt
  • 2 1/2 sticks (20 tablespoons) unsalted butter, cut into 1/4-inch pats
  • 6 tablespoons cold water

For Glaze:
  • 1 lb. box of powdered sugar
  • 1/2 c. cornstarch
  • Approx. 1/2 c. of milk
  • Green food coloring 
To make the filling, I cooked the 2 boxes of pudding, according to the package directions for pie, adding 3.5 cups of milk, instead of the recommended 3.75 cups, because I was paranoid that it would be too thin and was having nightmares about deep-frying these pies with the pudding oozing out, morphing into hot magma that would burst out of my pan! After letting it cool for 5 minutes in the pot, I removed it to a large bowl and covered the top with plastic wrap, pressing all the way down to the surface to prevent a skin from forming.
This pudding needs protection.
  Now for the crust.  This crust is actually excessively simple, however I worked in half-batches because I was afraid my food processor wouldn't fit all the dough.  I shouldn't have fretted as there was plenty of space, I recommend just doing it in one swift swoop.  

Add two thirds of the amount of flour and all the sugar and salt to a food processor bowl.  Pulse twice to incorporate.  Then add the pats of the butter (all 20 tablespoons...this is deep fried pie here, no point holding back), evenly over the dry ingredients and pulse again until the mix appears sandy in texture and is starting to clump, about 25 times.  Add the remaining third of flour, pulsing approximately 5 more times to incorporate.  Transfer contents to a large bowl.  (P.S.  I initially typed bowel here instead of bowl...it's definitely too early in the recipe for this to be transferred to your large intestines.  It has to be deep fried and sugar coated first.)

This flour is in need of some hydration

Sprinkle 5 tablespoons of COLD water onto the mixture and fold in.  If the mixture isn't clumping enough and the dough isn't forming add more water.  Remember, you can always add more water, but you can't remove it.  When finished it would look like a dough ball.
Quenched dough
Now you may be wondering, why you shouldn't just add the water in the food processor and save yourself this extra step.  The article that accompanies this pie recipe states that folding in the water gives your dough a "headstart" for flake formation.  Since I only made it the one way, I can't compare it to the all food processor method, but I can that the dough was quite flaky.  After this, I wrapped the dough in plastic wrap and let it in the fridge for 2 hours.  This allowed for the dough to firm up, as well as for the pudding to set up.

After the chill period, I took out the dough and divided it into 12 balls.  Additionally you want to place a deep-set pan on your stovetop, filling it with oil about 1" deep, and setting it on medium high.  Unfortunately the amount of oil was too low for me to place my thermometer, but you want the oil to be around 375 degrees F. 

Dust your work surface and rolling pan with flour, and, one at a time, roll out the ball into a flat disk.  The shape be a rounded off rectangle, about 5" x 4" (very approximately measurements).

Needs filling.
Next, I took out my handy dandy notebook ice cream scoop and placed 2 semi-scoops onto the lonely dough.
Nice and full.
After filling, fold the top over, making a packet and crimp/fold/superglue the edges so your little pudding packet is nice and secure.  Then continue make to 11 more!  Fry these bad boys one at a time until golden brown and delicious, keeping the remaining raw pies in the freezer or fridge to stay cold.
Deep-fried deliciousness
 Like this wasn't enough, now it's time to make and add your glaze.  Add the sugar and cornstarch and stir to combine.  Add in the milk, a little at a time, until you get a nice consistency.  It should be thick but pourable.  Now add your food coloring to your desired shade of green, and pour onto one side.  Keep 1/2 the glaze for the other side.
Which turtle color are you?
Allow the glaze to set up (I stuck mine in the fridge), then flip the pies over and glaze the second side.  Be gentle with these pies because they can break in half rather easily when warm.  Allow to cool, then devour.  They taste best when warmed up slightly from the chill of the fridge.  
I could only eat a few bites of this rich dessert, but my friend devoured 2 in 1 sitting!
Turtle power

This dessert is not for the weak of heart.
Well I hope you enjoyed this first post.  Please leave a comment, a critique, some feedback, or even just a hello.  And please don't fear: this is NOT my normal type of cooking, but I just had to post this one immediately.  I normally eat  (and will post) healthy, easy, veggie-filled recipes, not deep-fried monstrosities in all their glory.  I do love to bake, but I often try to "healthify" the recipe somewhat and only make truly indulgent food on rare occasions, like my friend coming up to visit from Atlanta.
 

Wednesday, August 31, 2011

Under Construction

I promise you that a page with be coming very soon.  Please stay tuned.